Porsche 993: How to Replace V Belts
The Porsche 993 is the last of the air-cooled 911s, which means it still has a fan driven by a belt. Here's how to change them out so you don't get left stranded with a hot engine.
This article applies to the Porsche 911 993 (1993-1998).
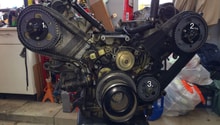
Changing the V belts on a 993 can be daunting. It's not the most fun of maintenance tasks, but it is critical in making sure that your air-cooled engine can keep driving that fan to keep itself cool. It's also essential for making sure you keep the belt's driven accessories operating like they should. There isn't a lot of space in there to make this an easy task, and it's definitely not as simple as having one serpentine belt to change out, but with a little patience and the correct tools, everything will work out just fine.

Materials Needed
- 24mm or 15/16" wrench
- Porsche tool P/N#999 571 052 02
- 13mm socket
- 13mm wrench
- 3" or 6" extension
- 5mm hex bit
- 4mm hex bit
- 8mm socket (For 1996+)
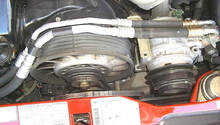
Step 1 – Loosen A/C line clamp
Using the 4mm hex bit or 8mm socket for 1996 or newer, loosen the clamp that holds the A/C lines together. You want to be able to freely move them out of the way.

Step 2 – Loosen the A/C tensioner bolt
There is a 13mm bolt on the right side of the A/C compressor. This is the A/C belt tensioner bolt. The bolt is tightened with a lock nut. Loosen both of these a few turns to relieve tension on the A/C belt.

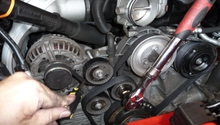
Step 3 – Loosen the bolts that hold down the A/C compressor
There are four 13mm bolts that hold down the A/C compressor. You must loosen these and slide the A/C compressor towards the center of the car in order to remove the belt from the pulley. Be careful not to lose the nuts on the other side of the bolts. Now, you can lift the belt off of the A/C compressor pulley and the crank pulley.

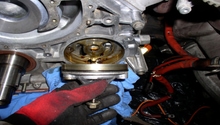
Step 4 – Loosen the alternator shaft bolt
Using the Porsche tool or 10mm triple square bit, hold the alternator shaft in place while turning the 24mm nut on the end of it. Loosening this nut will allow you to remove the pulley halves. Be careful because there might be shims in between. Keep track of how many there are. You can now pull the alternator pulley and belt off, and this will give you access to the fan pulley.

Step 5 – Loosen the three bolts holding the fan pulley
Using the 5mm hex socket, loosen the three bolts holding the fan pulley onto the fan. Spraying them with a little bit of penetrating oil will make them easier to break loose. After you have removed them, be careful because there might be shims that you will have to keep track of, and on 1995 993s, there is a little white tab. You can now pull the outer pulley half off. Slide the belt sensor out of the way and remove the belt.

Step 6 – Install new fan belt
Place the fan belt onto the crank pulley first and then align the center of the top of the belt with the alternator shaft. Re-install the shims you removed in Step 5. Place the outer half of the fan pulley onto the shaft and thread the three 5mm bolts by hand first. Squeeze the belt at the midpoint between the crank and fan pulley and slowly tighten the 5mm bolts until the two halves of the pulley come together. Be sure not to pinch the belt in-between the pulley halves. After the bolts are tight, check the tension of the belt. If it is too loose, you might need to remove shims. If it is too tight, you might need to add some shims.

Step 7 – Install new alternator belt
Just like with the fan belt, place the new alternator belt over the crank pulley first and then center the other end over the alternator shaft. Replace the shims. Slide the pulley half on the alternator shaft and then thread the 24mm nut on. Little by little, slowly tighten the nut until the two halves come together, being careful not to pinch the belt in between. Once it is tight, check the tension of the belt and adjust with shims as needed.
Pro Tip
After the alternator and fan belt have been installed, start the engine and look to see that they are turning smoothly with the pulleys. After you turn the engine off, check the belts for deflection at about 1/4".
Step 8 – Install the new A/C belt
Using a new A/C belt, slide it over the crank pulley first and then over the A/C compressor pulley. Slide the compressor back to the right and give the tensioner adjustment bolt a few turns to pick up some slack, but don't fully tighten yet. Now you can install the 13mm bolts that were removed before. Some adjustments might be needed to align the compressor so that the bolt holes align. Finish tightening these bolts and then check the belt tension. Once the desired belt tension is achieved, you can tighten the adjuster bolt nut and then place the clamp for the A/C lines back in place.
Step 9 – Start engine and check belts
Once everything is tightened up and complete, fire up the engine and check the belts to see how they are riding in the pulleys. Make sure they are not bouncing or hitting anything.
Related Discussion
- Serpentine Belt Conversion for 993 - Rennlist.com