Porsche: How to Repair Scratches and Paint Chips
Learn how to repair scratches on your Porsche 993 from your own garage.
This article applies to the Porsche 993 (1993-1998).
Let's face it. Scratches and paint chips on a Porsche 993 are never good. Not only are such blemishes an eye sore, but they can drive down the value of this attractive, high-performance sports car unnecessarily. Luckily, there are several products on the market today that can make repairing and restoring a Porsche 993 to its original finish. You won't need to spend a lot of money; however, this DIY project could take up to 5 hours (and a little elbow grease) to complete, so plan ahead. The low cost and relatively minimum time commitment make this one automotive repair you'll want to do from home.

Materials Needed
- Dr. ColorChip Basic Paint Chip Repair Kit
- Hose
- Bucket
- Microfiber cloth
- Cleanser
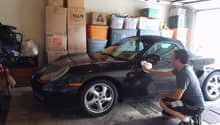
Step 1 – Clean car to a debris-free finish
Using a professional-grade automotive soap, wash the surface of your car until it is free of dust, dirt, grime, and other surface contaminants. Repeat, if necessary, using the two bucket car wash method. This eco-friendly method allows you to effectively remove dirt, debris and other particles from your cleaning cloths without transferring them back into your "clean" water. Rinse the microfiber cloth in the first bucket, and then wet it in the second, which, of course, is filled with your "clean" soapy water.

Pro Tip
Use your hose sparingly to reduce water waste and runoff. Empty and replace both buckets of water, as needed.
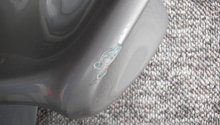
Step 2 – Spruce up damaged areas, including scratches
Using the color applicator provided by the manufacturer, work the ColorChip paint into the damaged area using slow, even strokes. The paint may appear to dry on site within minutes; however, you must wait two hours for the complete curing process to take place before moving on to Step 3.

Pro Tip
Take your time ensuring to apply the paint evenly and smoothly to the surface of your car for a professional-level finish.
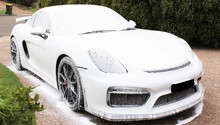
Step 3 – Buff to a smooth finish
Using a microfiber cloth, apply a few dots of polish to the cloth and begin to buff the panel. Using a slow, circular motion, buff the newly painted panel. Take special care not to remove the paint as you go. Apply a wax or sealant to the area to prevent UV damage from the sun while the car is parked outdoors or traveling on the road.

Pro Tip
Let the weight of the rag or old t-shirt do most of the work; this should not be a high-pressure exercise.
Related Discussions
- Dr. Colorchip Discussion - Rennlist.com
- DIY Paint Chip Repair - Rennlist.com
- 993 Paint Chip Repair - Rennlist.com
- Detailer's Perspective: Paint Chips - Rennlist.com