Porsche 997: How to Flush Radiator
If you've done any sort of repair on your Porsche's coolant system, especially due to a leak, you're going to need to refill the system. Here's how.
This article applies to the Porsche 911 997 (2005-2012).
Porsche states that the coolant in the Porsche 997 is a "lifetime" coolant. Many people will debate that you should probably flush the system as scheduled maintenance and that it couldn't hurt to do so. A flush and refill could also need to be done due to a failure of a component associated with the cooling system such as the expansion tank, water pump, or coolant hose. If this is a procedure that you think needs to be knocked out, here is a helpful guide in doing so.

Materials Needed
- Hex socket set
- Ratchet
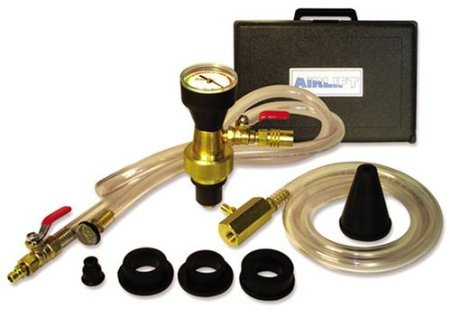
- Coolant system vacuum filling device
- Compressed air supply
- Coolant
- Container
- Distilled water
Before beginning any repair on your cooling system, you will want to ensure that your car is fully cooled off to prevent burning yourself with hot coolant.
The Porsche procedure for performing this task requires you to fill the coolant system with the vacuum method using a special tool. There are a few companies that make them. The one that is easiest to get is the UView 55000. Snap-on also makes a version, but it is a little bit more difficult to acquire.
Step 1 – Remove rear underside panel from car
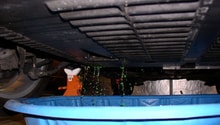
To start, you will need to remove the rear underside panel from the car in order to gain access to the areas where the coolant system needs to be drained from.
Step 2 – Open cap on expansion tank
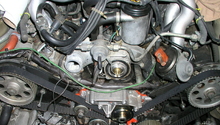
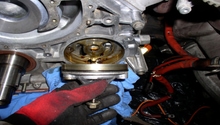
Locate the coolant expansion tank, open the cap on it and remove. Set the steel chamber bleeder valve to vertical. In Figure 2 below, the red arrow is pointing to the expansion tank, the blue arrow is pointing to the cap, and the green arrow is pointing towards the steel chamber bleeder valve.

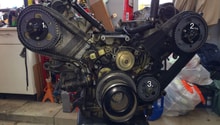
Step 3 – Remove coolant drain plug
Locate the coolant drain plug which is identified by the white arrow in Figure 3. Also, at this time you will want to open the spring clamp on the hose on the inlet side of the water pump and remove the hose. Coolant will start to drain out. Make sure you are ready to collect it in a clean container. After the coolant is done draining, you can place the hose back on the water pump and re-install the drain plug. Make sure to install a new sealing ring on the drain plug before you install it.

Step 4 – Remove inlet and outlet hoses from radiators
Next, in order to drain the coolant from the radiator side, you will want to remove the inlet and outlet hoses from the radiators. You do this by pulling of the spring clips for the two Henn couplings and pulling the hoses away from the coolant pipes. Coolant will drain out and you will want to be ready with a clean container to drain it into. After it is done draining, you will want to insert the hose and reattach the clips. When you press it in, you should hear an audible snap. You can check the position by pulling on the hoses.
Figure 4 below shows you the cooling hoses you will have to disconnect and drain on the coolant system.

Pro Tip
Installing new O-rings on the couplings before re-installing them will prevent them from leaking.
Step 5 – Remove heating hoses
After you have drained the radiators, you will then need to drain the heater side of the cooling system. These hoses have the same couplings as the radiator inlet and outlet hoses so you will need to remove the spring clips on the Henn couplings before removing them. With these hoses you will first want to use hose clamps to block the coolant from coming out due to the fact that it will drain very rapidly. The hose clamps will allow you to slowly open them and control the flow. Make sure you have a clean container ready to catch the coolant as it comes out. After they are done draining, you can reattach the hoses and replace the clips.
Step 6 – Screw cap adapter onto expansion tank
Now that you have drained all the coolant and reattached all the necessary hoses, it is time to fill the cooling system back up with coolant. This is where you will use the special tool to create a vacuum and draw in the coolant. You should have an adapter with your tool that will allow you to screw it onto the expansion tank in place of the cap. Some tools will connect directly to the expansion tank, and others will use an adapter with a flexible hose. Make sure all the valves on the vacuum unit are in the 'off' position.

Step 7 – Place a canister filled with coolant near expansion tank
You will need to acquire a container that you will fill with the required amount of coolant mixture. This container will be placed near the expansion tank and this is what, when vacuum is applied to the system, will be the supply of coolant to the system. You will need about two liters of extra fluid in order to make sure that you don't suck air into the system. A hose will run from the container to the vacuum device. It is best to use a clear hose so you can see the coolant entering the system.

Step 8 – Connect compressed air supply
In order for the vacuum device to work, it needs to be hooked up to a compressed air supply. After you have acquired one, go ahead and connect it to the vacuum device and open the shutoff valves, allowing the air to pressurize the system. A hissing sound once the air is connected and the system is pressurized is normal. Deformation of the hoses is also normal. If you cannot build vacuum, it is possible that there is a leak in the coolant system.
Step 9 – Build vacuum in the system
After you have connected the compressed air and build up sufficient vacuum in the system, you can disconnect the compressed air and allow the system to draw in the coolant. After it has drawn in enough coolant, you can disconnect the vacuum device.
Step 10 – Top off expansion tank
After removing the vacuum device, double check the expansion tank coolant level and top off if necessary. Replace the cap.
Step 11 – Test drive
Porsche recommends that you test drive the vehicle and accelerate briefly to 6,000 RPM a number of times from idle. This should allow the system to ventilate correctly. After you have done this, check the level in the expansion tank and top off with coolant if necessary after the engine has cooled.
Related Discussions and Sites
- Coolant Flush and Refill - Rennlist.com
- DIY Radiator and Coolant Flush - Rennlist.com
- Flush Coolant System - Pedrosgarage.com
- Buying Airlift Tool - Amazon.com