Porsche 997: How to Install Mufflers
Installing aftermarket mufflers on your Porsche 997/911 is a great modification if you're looking to add a new element to your car, and gain some extra power. This article will guide you through the process of installing mufflers to your Porsche 997/911.
This article applies to the Porsche 997/911 (2005-2012).
An exhaust upgrade is one of the most common modifications you can do to any car. You free up some extra power, you get a different sound out of your car, and if you choose a well designed aftermarket exhaust, you usually get improved drivability. It's probably one of the best bang for your bucks when it comes to modifications.
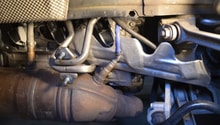
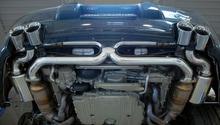
The exhaust of a Porsche 997/911 is made up of three basic components: the header/catalytic converter assembly, the two side mufflers, and one center muffler. There are aftermarket parts available to replace all of these components with improved parts.

Materials Needed
- 10mm, 12mm, and 14mm sockets
- Jack and jack stands, ramps, or lift
To start things off, some people, while performing the removal and installation of the mufflers, will remove the rear bumper cover. They claim that this allows for more space, and the ability to reach certain fasteners. It can also maneuver the mufflers. It is not incredibly difficult to remove the rear bumper cover, and that process is detailed here. It will be up to you to decide which direction to take. Just know that it is possible either way. If you don't think you can lift the rear of the car up very high, you probably want to consider removing the rear bumper cover.
Also, it is good to keep in mind that all aftermarket exhausts might be different in how they are installed. So it is best to read, understand, and follow any instructions that your specific aftermarket exhaust might come with.
Step 1 – Elevate the rear of the car
Whether you are using a jack and jack stands, ramps, or a lift, you are going to want to elevate the rear of the car to gain access to the exhaust system. This will aid in getting to the fasteners, and removing the mufflers themselves.
Pro Tip
Removal of the rear wheels will give extra working space to remove the exhaust components.
Step 2 – Remove center muffler
The center muffler on the car is the first thing you will want to remove. It is held onto the catalytic converters by three nuts on each side, and onto the side mufflers by clamps. Once you have loosened these, you should be able to remove the center muffler.

Step 3 – Remove side mufflers
The side mufflers are held onto the car by bolts. You have already loosened the clamps that attach the side mufflers to the rest of the exhaust. So once you loosen the bolts, you should be able to remove the side mufflers. There is a bar that connects the rear bumper to the car. This might also need to be removed to give you enough space to remove the side mufflers.
You may also need to remove the exhaust tips. It all depends on if you are going to reuse them on your new exhaust.

Step 4 – Install new exhaust components
The install is the reverse of removal. Install your side mufflers first. You might need to carry over some brackets from your stock exhaust, or the new exhaust might come with its own brackets. After you install your side mufflers, you can then install your new center muffler or bypass.

Step 5 – Test drive
Any time you install new components on your car that change the airflow coming in or going out, you will want to take the car on a test drive to let the computer make any necessary adjustments. It is a good idea to take it through its complete rev range progressively, and at varying different speeds. Listen for exhaust leaks or any abnormal noises that could indicate an improper installation.
Related Discussions
- DIY Muffler Install - Rennlist.com
- How to Remove Rear Bumper Cover - Rennlist.com
- 16 Steps to Installing Exhaust on 997.2 - Rennlist.com