Porsche 928: How to Replace Tie Rods
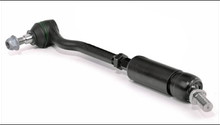
Tie rods are the link between the steering rack and the wheel hub itself. As it's largely responsible for the steering feel, tie rod replacement can provide the driver with a greater sense of confidence behind the wheel. Not to mention, improved road handling. Replacement is simple, but the steps must be performed with utmost care.
This article applies to the Porsche 928 (1978-1995).
In order to verify that those odd feelings coming from your steering wheel are indeed a worn-out tie rod, you can check by grabbing the affected wheel and tugging at nine and three-o'-clock, while inspecting where the ball as well as socket end meet. Once the concealing rubber boot is pulled back, if these components are moving excessively, the tie rod is the culprit. Replacing them is a fairly straightforward task with only a few tools needed, but the importance in the steering system and general safety of your vehicle means the replacement must be done properly.

Materials Needed
- Jack and jack stands
- 22mm wrench
- 32mm wrench
- Hammer
- Crowbar (optional)
- Tie rod removal tool (if replacing)
- WD-40
Step 1 – Loosen the wheel
The first step in replacing the tie rods is fairly simple: remove the wheel. Jack up your Porsche, secure it on stands, and remove the front wheels. On a side note, if there is a substantial amount of transmission fluid in the boot (a little is fine), the rack is leaking and must be replaced eventually.
(Related Article: How to Jack Up Your Car - Rennlist.com)
Step 2 – Remove the tie rod
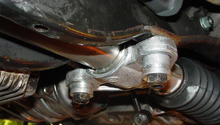
Once the wheel is removed, remove the lock nut of the tie rod ball joint. The tie rod must then be knocked out of position. Using a hammer, and a crowbar if needed, the ball joint will be removed with a few deft, accurate knocks. However, this can be tricky (one of the few quirky parts to this procedure), and a tie rod removal tool may be needed. They're available at most auto parts stores. Keep in mind that these tools can damage the tie rod, so they are only recommended to be used if you are replacing the tie rod, and not just removing and re-installing.

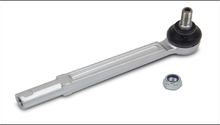
The inside end tie rod can be removed with a 22mm open wrench while counter-holding the rack with a 32mm wrench. After the tie rod is loosened and removed, replace the old tie rods with the new pieces. Measure the old rods' number of threads showing at the tie rod end. Adjust the new tie rods to match the measurement, and toe will be largely restored to its proper angle.

Figure 2. Use the wrenches to remove the tie rod. 
Figure 3. Measure the number of exposed threads on the old tie rod, and adjust the new one to match.
Step 3 – Insert the new tie rod
Thread the tie rod into the steering rack. Following this, place the rubber boots on new tie rods. Check and make sure the steering stop donut is in place, as it can be removed when removing the old boots. New tie rods are stiff, and an additional set of hands may be needed to turn the steering wheel to secure a good fit. Once the tie rods are placed in their socket, tighten the lock nut and tighten the tie rod to steering arm with 47 lb/ft of torque. Then, torque the tie rod to the steering rack with 108 lb/ft. The new boots will then need to be fitted into place. This may require some WD-40. At this point, make sure to center the rack by removing the plastic plug of the front of the steering rack housing opposite from where the steering shaft enters.
Double check everything for adequate tightness, attach wheels, and drive gently so that the components can "settle" into their natural shape. In order to assure proper alignment, an alignment shop should be visited.
Related Discussions
- Servicing Tie Rods - Rennlist.com
- Adjusting Tie Rods - Rennlist.com
- Torquing Tie Rods - Rennlist.com
- Tie Rod Removal from Rack - Rennlist.com