Porsche 993: How to Replace Starter
If your Porsche 993 isn't cranking over, you will need to replace the starter. This article will guide you through the steps to do just that.
This article applies to the Porsche 993 (1993-1998).
The starter's job is to start your car by cranking the engine over. There is a variety of issues that can cause a no-start condition in the Porsche 993. Often times the starter motor is in perfect working order, but there is a fault in the starter relay, battery and connections, key fob, immobilizer, or clutch switch that will keep your starter from cranking the engine over. Similarly, some owners have reported that their flywheel was missing some teeth, and thus preventing the starter from properly engaging. Proper diagnosis of these faulty components is fairly straightforward and can save you a good chunk of change. If a thorough diagnosis does in fact point to a failed starter, this guide will walk you through the replacement procedure.

Materials Needed
- Jack and jack stands
- 8 and 10mm Allen (hex bit) sockets
- 3/8" and 1/2" drive ratchets
- Various length extensions
- Universal joint adapter (or UV joint sockets)
- Breaker bar
- Torque wrench
- Anti-seize paste
- Wire ties
This procedure outlines the starter replacement from underneath the vehicle. Some individuals opt to cut out a small section of the body under the rear seats to make the replacement a breeze. While there is little to no loss in chassis rigidity, most owners consider the cutting method to be sacrilegious as it will tarnish the car's originality. That being said, most owners have reported good results and quick starter swaps with the cutting method; however, this DIY will provide the steps to keep your car in its factory state.
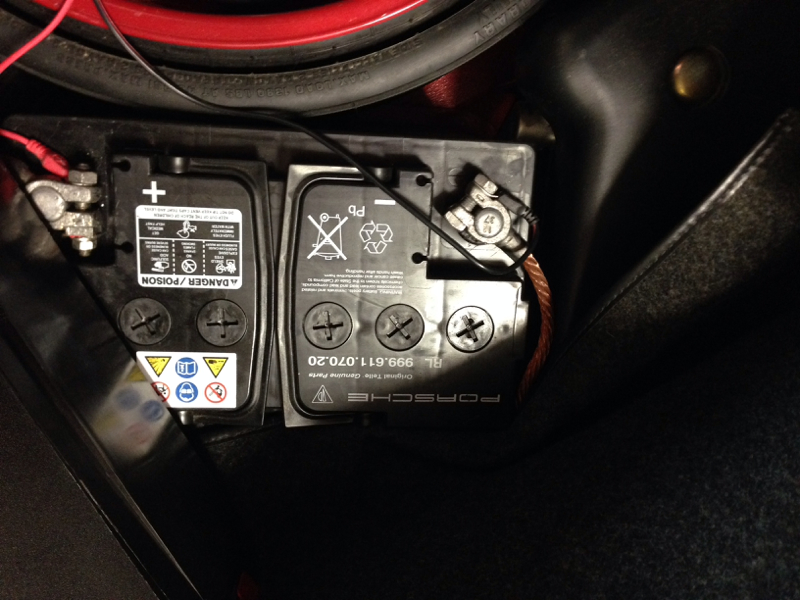
Step 1 – Disconnect battery and lift car
The first step in replacing the starter on your 993 involves disconnecting the battery. The starter solenoid has a hot wire running to it that can accidentally short across if it comes in contact with chassis and suspension components. Disconnect the battery cables and keep them away from the terminals. They can be wrapped in a shop rag or tied out of the way to prevent them from contacting the terminals and energizing the system.
With the battery disconnected, lift the car with a floor jack and support it with jack stands on level ground. To best access the starter, it is recommended that the car be supported at least 18" off of the ground to allow for sufficient room to work underneath the vehicle.

(Related Article: How to Jack Up Your Porsche 993 - Rennlist.com)
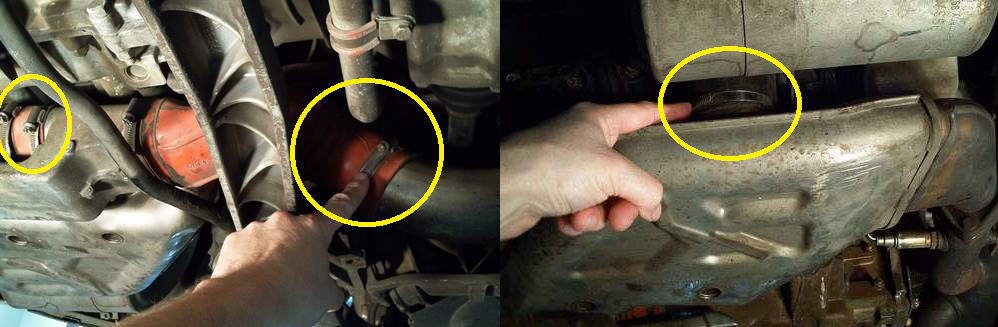
Step 2 – Remove passenger's side rear wheel and heater hoses
-
With the vehicle supported, remove the passenger's side rear wheel from the car.
-
Underneath the car, disconnect and then remove the heater hoses from the heater boxes as well as heat exchangers on both banks. These are simply held on by worm-type hose clamps.
Step 3 – Disconnect drive axle
-
Next, disconnect the passenger's side drive axle from the transmission. The axle is secured by six socket head bolts. These are best removed using an 8mm Allen socket attached to a couple of lengthy extensions (10" or longer) and a ratchet. Be sure the socket is secured in place when attempting to remove the bolts as the heads can easily become stripped out.
-
Remove the drive axle from the transmission by pulling it towards the outside of the car (towards the brake rotor) and sliding it backwards. With it separated from the transmission, move it out of the way.


Pro Tip
- The axle will need to be rotated to gain access to each bolt. With the transmission in neutral and the parking brake released, rotate the axle as needed to reach each fastener.
- It is also recommended that the axle orientation be marked for correct reassembly. Some owners have experienced an unwanted vibration due to an axle being attached to the transmission in a different position than it was previously installed.
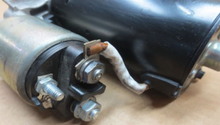
Step 4 – Disconnect starter wiring and remove starter
With the axle separated from the transmission, the starter should be fairly accessible.
-
Disconnect the wiring from the starter solenoid. The larger 50 amp terminal holds two large wires, whereas the smaller 30 amp terminal holds only one wire. Some solenoids may have a rubber protective cap over the smaller terminal that needs to be removed to access the hold down nut.
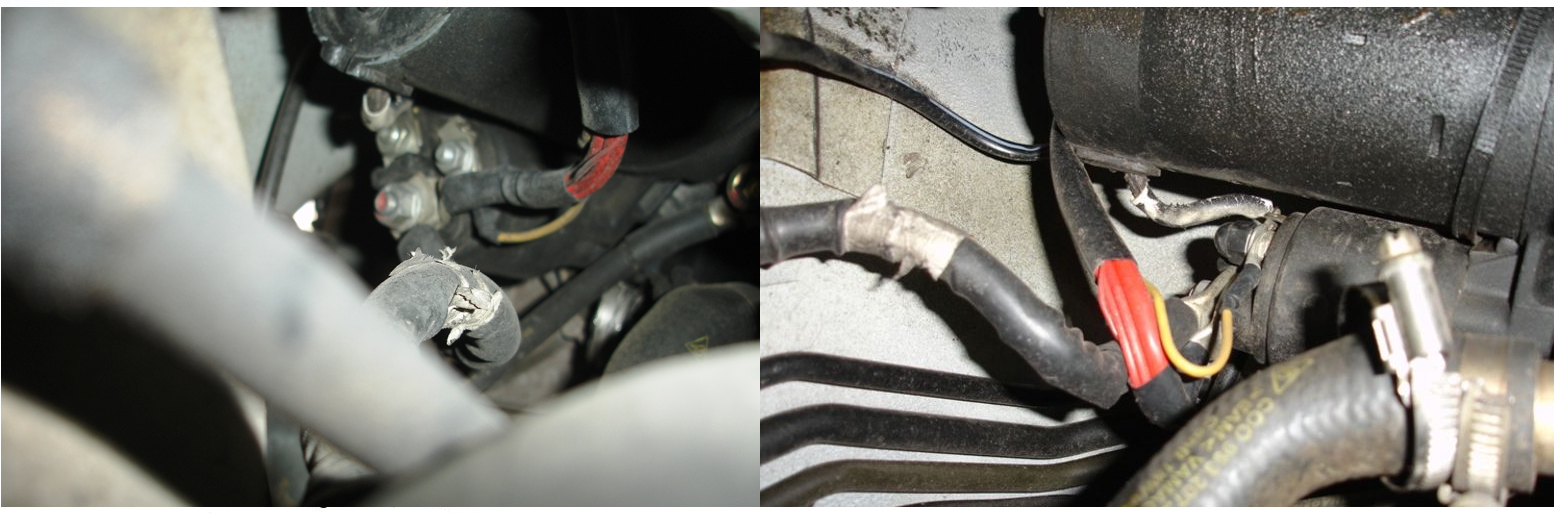
- To remove the starter, first cut the two wire ties securing the wiring to the starter motor.
- Remove the two starter mounting bolts using a 10mm socket. The lower bolt is easily accessed, so go ahead and remove that now. The upper bolt is a bit more tricky to remove and will require a combination of a universal joint, short extension, and a good dose of patience. The bolt may be partially seized in place; therefore, a 1/2" breaker bar is recommended for removal.
-
With the mounting bolts removed, the starter can be maneuvered out of the car. The ground cable can be bent out of the way if necessary.
Pro Tip
Take note that there is a ground wire behind the lower starter mounting bolt. Be sure to put it back in place when installing your new starter.
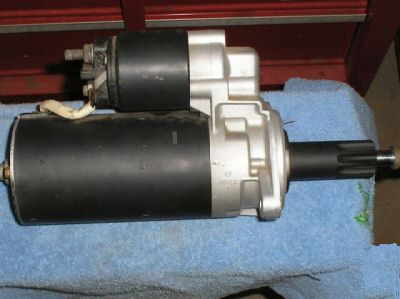
Step 5 – Install new starter and reassemble car
- Install the new starter motor in place. Since space is limited, tighten the top bolt as much as possible by hand before using a ratchet or breaker bar to finish it up.
- The torque specification for the starter motor mounting bolts is 34 ft./lbs. However, it is nearly impossible to get a torque wrench on the top bolt. Torque the bottom bolt to get a feel for the tightness, and then tighten the top bolt to an equal amount with a ratchet or breaker bar.
- Attach wiring to the solenoid. It is worth noting that some newer style starters come with four posts, as opposed to three like the original starter had. Just be sure to attach the large wires to the 50 amp post and the smaller to the 30 amp post. Also, secure the wiring to the starter using wire ties.
- Cap off the 30 amp terminal. If your starter did not have a rubber cap, a new one can be ordered (Part #: 999-703-231-40).
- Reattach the drive axle to the transmission, being cautious of the correct orientation. Be sure the transmission flange and the drive axle is free of any dirt or debris before attaching the axle.
- Apply anti-seize paste onto the threads of the drive axle bolts and torque to 60 ft./lbs.
- Reconnect heater hoses, re-install rear wheel, and reconnect battery cables to the battery.
-
Test the starter to ensure proper operation.
Related Discussions
- 993 Starter Replacement - Rennlist.com
- HELP? Starter Motor Will Not Activate - Rennlist.com
- I Need Help! Starter Spinning but Engine Does Not Start - Rennlist.com
- Help! 993 Won't Start - Rennlist.com