Porsche 993: How to Install a Lowering Kit
For the track or the show, lowering the Porsche 993 is one of the first serious mods many owners take on. Here's how to tackle the job.
This article applies to the Porsche 993 (1993-1998).
There are two basic reasons someone would want to lower their Porsche 993. First, for the look. "Wheel gap" or the area from the top of the tire to the fender is viewed as unsightly, and lowering the car reduces this gap. The second reason is to adjust the handling and performance of the car, maybe to improve lap times at a local circuit, or just to make the car more stable and planted through your town's backroads. Maybe it's all of the above. Whatever your reason, here's how to install that shiny new suspension kit onto your 993. This article assumes your new suspension is "pre-assembled." That is, the springs and tophats are already together, and you don't need to reuse any stock parts.

Materials Needed
- Lowering kit
- Jack and jack stands
- Metric socket and wrench sets
- Cutting pliers
Step 1 – Secure car on jack stands and remove the old suspension
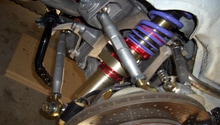
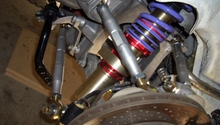
Once you have the car secured on jack stands and your new suspension ready to go, the first step is to get the old stuff out. Tackle the fronts first. Remove the two large bolts holding the strut to the upright, and the four bolts under the hood holding the tophat to the chassis. Next, use the cutting pliers to cut a slit in the bracket holding the brake line in, and bend it out of the way. Disconnect the sway bar drop links and any wiring clips, and it’s ready to come out. You can now pull the complete strut assembly (damper and spring) out.
The rears are a little bit trickier. You will have to remove the undertrays and sway bar first, followed by the lower toe control arm. Inside the engine bay, remove the airbox cover to access the top hats. Just like the front, cut the brake line bracket and free the line. Now the struts are ready to come out.
(Related Article: Porsche 993: How to Jack Up Your Porsche - Rennlist.com)
Pro Tip
Any time you are dealing with eccentric bolts, it’s a good idea to mark their starting position, so you can set them in the same spot on reassembly.

Step 2 – Install the new suspension
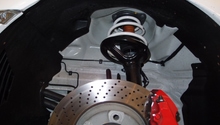
Installation is a reverse of removal on both the front and the rear. For the DIY'er who is new to this job, it's a good idea to do this one side at a time. That way if you get stuck, you can look at the other side that is still assembled for reference.
- Install new strut assembly into the upright/suspension knuckle.
- Fasten all related bolts.
- Line the tophat up the with upper shock mounting point and fasten.
- Reconnect the brake lines, sway bar drop links, and any other pieces removed for access.
Once the new suspension is fitted, it's important to torque all bolts to spec. Refer to a service manual to get the numbers right. With suspension components, it's always a good idea to just lightly snug the bolts, then load the suspension as if it were on the ground before torquing. Especially on links that have bushings, torquing bolts down at full droop will cause extra stress once the car is back on its wheels. To do this right, carefully lower the car onto jack stands positioned under the lower control arms. This will approximate the static height. From this position, torque everything down and refit the wheels.

Step 3 – Settle the springs
It's crucial to have your car aligned whenever adjusting the ride height, as even a small change will affect the angles on the wheels. However, you may not want to have it done immediately. New springs will take some time to settle once weight is put on them for the first time. It's a good rule of thumb to give the car roughly a few days of sitting and driving before having the final alignment/corner balance done. Of course, you can do it immediately if you are concerned about tire wear or handling, but make sure to get it done again once the suspension is worn in.

Related Discussions
- Bilstein PSS10 993 Coilovers Install Help - Rennlist.com
- DIY Suspension Upgrade - Rennlist.com
- Which Suspension Upgrades - Rennlist.com
- Which Coilovers - Rennlist.com
- Best Way to Lower 993 - Rennlist.com