Porsche 997: How to Install Sway Bar
Sway bars are an easy-to-choose suspension upgrade because they reduce body roll with little consequence to the ride quality. Continue reading to find out how to install a sway bar in your Porsche 997.
This article applies to the Porsche 997/911 (2005-2012).
Your Porsche 997 has a strut-type front suspension. The dynamic camber curve goes against what you want it to do, meaning that your wheel loses traction at a rapid rate under load. The only way to combat this is with roll stiffness, either in the form of stiffer springs and shocks, or sway bars.
A sway bar is a metal bar that literally connects that front suspension, and reduces roll on the push-pull principle. For example, if you make a hard left turn, the right suspension loads up and the left side suspension goes light. A stiffer sway bar will better connect the front suspension, limiting the amount of roll that the right side suspension can have (pushing) by tethering it to the unloaded left side suspension (pulling). In a way, a sway bar acts like "effective spring rate" by making the front end stiffer under cornering. Less front end roll makes the best of the MacPherson strut suspension, and keeps the wheels firmly planted by lessening the camber change under load.
If this all sounds like gibberish, here's the golden lining: Bigger sway bar equals less roll. Less roll equals flatter cornering. Flatter cornering equals more grip in the front end on the initial turn into a corner. Combating the 911's corner entry understeer is a good thing, so let's get to it.

Materials Needed
- Socket set with 18, 16, 15, 14mm sockets
- Polyurethane grease
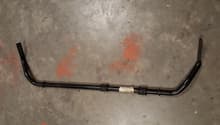
- Sway bar
- Safe jacking equipment (jack, jack stands, wheel chocks)
- Tie rod removal tool
Step 1 – Jack up the car and remove front wheels
Jacking up the car should always be done safely. Sure, it goes without saying, kind of, but it's also important. Don't hurt yourself or your car even a little bit. One is going to be highly painful and irritating, and the other is injury.
You will be removing the wheels purely for increase access to the suspension bits. Remove the wheels and set them aside. Remember where you put your wheels. You are going to want to put them back on once you get the sway bar business sorted out.
(Related Article: How to Jack Up Your 997 - Rennlist.com)
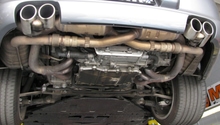
Step 2 – Remove the under tray
The under tray's job is to protect your car, and provide better aerodynamics. It's sort of like your car's pants, in a way. But you are doing surgery today, so you don't need pants. Carefully undo the front piece of the tray from the bumper, sides, and rear tray. Then, set it and the screws aside. This is a great time to make use of a magnetic dish to keep track of screws if you have one of those, or maybe an egg crate. If you lose a screw and your under tray is flapping in the wind, it's not going to do anything for your aerodynamics. Porsche spent the last 50 years working on those, so let's be careful.
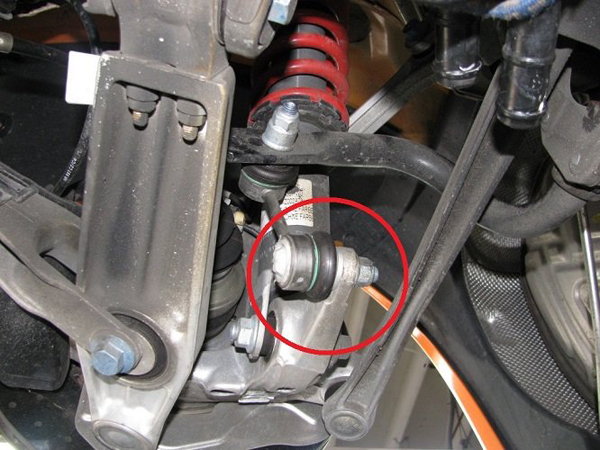
Step 3 – Loosen nut
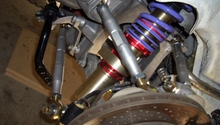
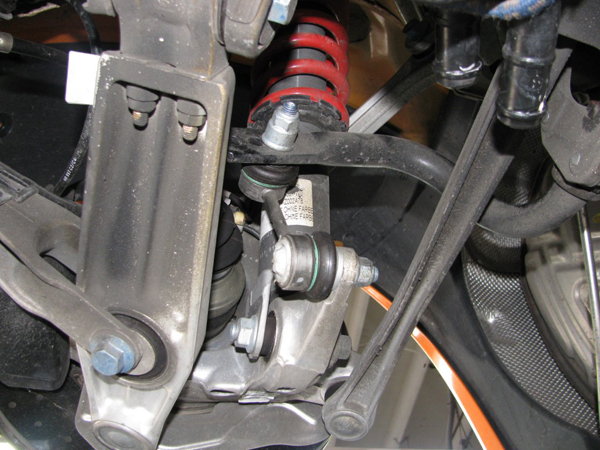
You will now need to loosen the nut holding the end links to the hub carrier. In Figure 2, you can see the end link is the double-lollipop-looking thing that connects the sway bar to the hub carrier. Loosen it from said carrier, and let it dangle from the sway bar end once it's loose. You got fancy new end links with your sway bar kit, right? If not, you may be reusing the ones that came on your car. They're probably perfectly good, but replacement ones often look fancier (e.g. anodized aluminum), and might have some adjustability added.
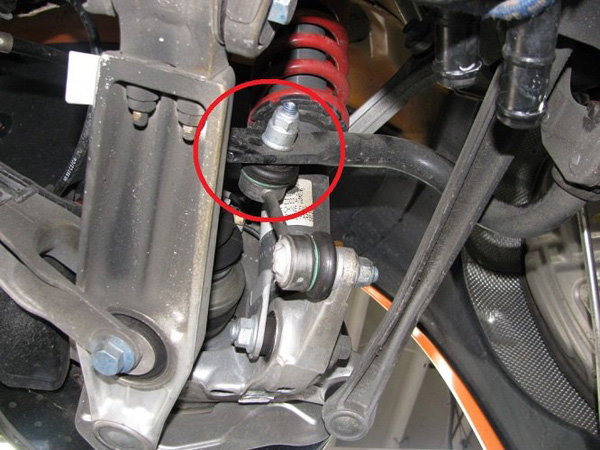
Step 4 – Disconnect tie rods
Again, from the photo above, the tie rod is the metal beam that connects to the hub carrier just under where the end links connect. Its job is to link the steering rack and the hub carrier, so that your steering rack can move the wheels. You need it out of the way, so you can wiggle the sway bar out of the car once you get that disconnected. Use an 18mm socket to unscrew it.
Once that's done, you're going to need to disconnect the tie rod from the hub carrier. Like when Patrick Swayze lifted Jennifer Grey's character in the ultimate scene of Dirty Dancing, this is a delicate maneuver and not to be taken lightly. That's why there is a special tool for it called a tie rod removal tool.
Step 5 – Loosen coolant system bolts
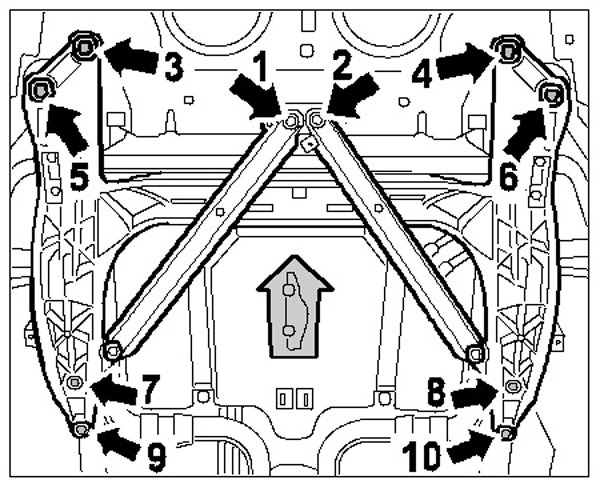
Find the 10mm bolts near #5 and #6 in Figure 3. They're part of the cooling system, and will help you avoid a nasty leak during the sway bar wiggling process that will come soon.

Step 6 – Loosen the subframe
Now you are getting to the real nitty gritty, as they say in the Roadhouse, or would have (probably) if they worked on Porsches. The subframe is an integral part of the car, so you want to be careful here. Still, you do need to loosen it in order to get the sway bar out, so let's be cautious but confident. Back out the bolts shown in Figure 3's diagram (above). You may choose to leave some loose instead of all the way out. As long as you have room to maneuver the sway bar, you're good.
Step 7 – Loosen the bolts holding the sway bar
At last! Loosen the two 15mm bolts on each side that hold the sway bar bushings, and thus the sway bar itself. There is a plate that traps the bushing in place, and it will need to come out.
Step 8 – Install is the reverse of removal
Yes, it's cliche to say that, but it's the truth. First, though, do make sure the bushings on your new sway bar are nice and greasy. You should have gotten some grease with the bushings that came with your bar. If you bought your sway bar used, you might consider upgrading the bushings while you're in there. They are a wear item, so you might as well. If you have a super stiff bar but worn out bushings, well, you wasted your money on that stiff bar.
Here are some torque specs for the bolts, referring to the diagram in Figure 5:
- Numbers 5, 6, 7, 8, 9, and 10: 118 ft.lb.
- Numbers 1, 2, 3, and 4: 74 ft.lb.
- Tie rod: 56 ft.lb.
- Sway bar links: 64 ft.lb.
Note
In order to ensure noise free operation, the sway bar can only be fastened to the sway bar links with the suspension loaded (i.e. with the car sitting on terra firma). Being that your 911 is a low-slung sports car, this may seem like quite a chore. The best way to do this without a vehicle lift is to use a stack of 2x4 to set the front wheels on. This will load the suspension up, while giving you enough room to squeeze under the car.
Improperly fastening vital suspension bolts can lead to clunking and creaking noises, followed by silence. That is the silence of the fasteners backing out and shooting off once you push the car hard around a corner, leading you to have effectively no sway bar at all. This has happened even to the best of us who thought we were high and mighty as well as smarter than the suspension engineers. We have since learned better, we promise.
Related Discussions
- DIY Front Sway Bar Install - Rennlist.com
- Front or Rear Sway Bar for 997 - Rennlist.com
- Front Sway Bar Removal with Pictures - Rennlist.com